ReNamer:Using presets: Difference between revisions
(shortcuts section added) |
(Restructure sections, rephrase the introduction) |
||
| (28 intermediate revisions by 2 users not shown) | |||
| Line 1: | Line 1: | ||
{{Go|up=ReNamer|next=ReNamer:Presets Manager}} | |||
A "preset" is a set of rules that is saved with a user-defined name. It can also save custom [[ReNamer:Filter_settings|filter settings]]. | |||
You can save frequently used rules as presets, and load them up on demand. You can also use saved presets for unattended renaming via [[ReNamer:Command Line|command line options]]. | |||
== Save a preset == | |||
How to create a preset: | |||
# [[ReNamer:Managing rules|Create a list of rules]]. | |||
# Configure [[ReNamer:Menus for the Files pane#Filters_menu|filter settings]], if necessary. | |||
# Press '''CTRL + S''', or use the '''Presets » Save As''' menu option. | |||
# A window pops up:<br>[[Image:SavePresetDialog.png]] | |||
# | |||
# | |||
# Press '''CTRL+S''', or use the '''Presets | |||
# A window pops up:<br | |||
# Enter a new name in the '''Name''' box, or select one of the existing presets listed below to overwrite it. | # Enter a new name in the '''Name''' box, or select one of the existing presets listed below to overwrite it. | ||
# Put a tick in the check box if you want to save the current filter settings. | # Put a tick in the check box if you want to save the current filter settings. | ||
# Press the '''Save''' button. The preset is saved. | # Press the '''Save''' button. The preset is saved. | ||
You can abort the process by pressing the '''ESC''' key or closing the window. | |||
== Load a preset == | |||
| | |||
Saved presets can be loaded via the '''Presets » Load''' menu or via the [[ReNamer:Presets Manager|Presets Manager]]. | |||
For quick access, the top 9 presets can be loaded via '''CTRL + 1''' through '''CTRL + 9''' shortcut keys. Presets are sorted alphabetically, so you can rearrange their order by renaming them. | |||
When you load a new preset you lose the current set of rules, if you had any. | |||
You can also append rules from an existing preset to the current set of rules by holding down the '''SHIFT''' key when lading a preset via the '''Presets » Load''' menu. This feature is available since ''v7.1.0.6 Beta''. | |||
== Manage presets == | |||
The [[ReNamer:Presets Manager|Presets Manager]] offers several options for managing your collection of presets, including loading, merging, duplicating, renaming and deleting. | |||
You can access it via the '''Presets » Manage''' menu option or using the '''CTRL + P''' shortcut from the main window. | |||
[[File:PresetsManager.png]] | |||
== Presets directory structure == | |||
The preset files can be structured in a directory hierarchy, as opposed to having them all in a single folder. This feature is intended to simply the management of a large collection of presets. | |||
[[File:ReNamer presets directory structure.png]] | |||
To save a preset in a directory structure you just need to specify the structured path when saving a preset. | |||
For example, "Folder\Preset" will save a preset by name "Preset" in a folder by name "Folder". | |||
Alternatively, you can browse to the presets folder and arrange them using the Windows Explorer. | |||
== Locate presets == | |||
Presets are stored as plain text files, located in the "Presets" folder. In a portable version, this "Presets" folder is in the same directory as "ReNamer.exe". In an installer version, it is normally located in Windows user profile folder. | |||
You can tell by launching ReNamer and opening the Presets Manager: "Presets > Manage..." (Ctrl+P). In the top you will see the path to the presets folder (see pictures above). There is also a menu item "Presets > Browse..." which will open Windows Explorer with the Presets folder in view. | |||
To backup or transfer the stored presets to an another location or PC, simply copy *.rnp files and you are done. | |||
See also [[Application Data Storage]] for additional information on locating your application data. | |||
== Transfer presets == | |||
How to transfer presets between computers or between multiple installations of ReNamer? | |||
Open ReNamer on the source computer, go to the ''Main Menu » Presets » Browse''. A file browser window should open at the location where your preset files are stored. You can copy these files and then import them into ReNamer on the target computer by either manually placing the files in the presets directory or using the ''Main Menu » Presets » Import''. | |||
[[Category:ReNamer]] | |||
Revision as of 23:15, 2 March 2025
A "preset" is a set of rules that is saved with a user-defined name. It can also save custom filter settings.
You can save frequently used rules as presets, and load them up on demand. You can also use saved presets for unattended renaming via command line options.
Save a preset
How to create a preset:
- Create a list of rules.
- Configure filter settings, if necessary.
- Press CTRL + S, or use the Presets » Save As menu option.
- A window pops up:
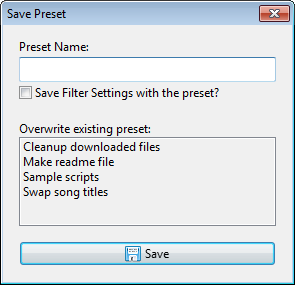
- Enter a new name in the Name box, or select one of the existing presets listed below to overwrite it.
- Put a tick in the check box if you want to save the current filter settings.
- Press the Save button. The preset is saved.

You can abort the process by pressing the ESC key or closing the window.
Load a preset
Saved presets can be loaded via the Presets » Load menu or via the Presets Manager.
For quick access, the top 9 presets can be loaded via CTRL + 1 through CTRL + 9 shortcut keys. Presets are sorted alphabetically, so you can rearrange their order by renaming them.
When you load a new preset you lose the current set of rules, if you had any.
You can also append rules from an existing preset to the current set of rules by holding down the SHIFT key when lading a preset via the Presets » Load menu. This feature is available since v7.1.0.6 Beta.
Manage presets
The Presets Manager offers several options for managing your collection of presets, including loading, merging, duplicating, renaming and deleting.
You can access it via the Presets » Manage menu option or using the CTRL + P shortcut from the main window.

Presets directory structure
The preset files can be structured in a directory hierarchy, as opposed to having them all in a single folder. This feature is intended to simply the management of a large collection of presets.

To save a preset in a directory structure you just need to specify the structured path when saving a preset.
For example, "Folder\Preset" will save a preset by name "Preset" in a folder by name "Folder".
Alternatively, you can browse to the presets folder and arrange them using the Windows Explorer.
Locate presets
Presets are stored as plain text files, located in the "Presets" folder. In a portable version, this "Presets" folder is in the same directory as "ReNamer.exe". In an installer version, it is normally located in Windows user profile folder.
You can tell by launching ReNamer and opening the Presets Manager: "Presets > Manage..." (Ctrl+P). In the top you will see the path to the presets folder (see pictures above). There is also a menu item "Presets > Browse..." which will open Windows Explorer with the Presets folder in view.
To backup or transfer the stored presets to an another location or PC, simply copy *.rnp files and you are done.
See also Application Data Storage for additional information on locating your application data.
Transfer presets
How to transfer presets between computers or between multiple installations of ReNamer?
Open ReNamer on the source computer, go to the Main Menu » Presets » Browse. A file browser window should open at the location where your preset files are stored. You can copy these files and then import them into ReNamer on the target computer by either manually placing the files in the presets directory or using the Main Menu » Presets » Import.