ReNamer:Using presets: Difference between revisions
No edit summary |
No edit summary |
||
| Line 1: | Line 1: | ||
A "preset" is a set of rules that is saved with a user-defined name | A "preset" is a set of rules that is saved with a user-defined name. It can optionally save the [[ReNamer:Menus for the Files pane#Filters_menu|'''Filter''' setting]] also. | ||
You can save frequently used sets of rules as presets, and load them instantly. This saves you a lot of time. <br>(Without the presets, you would have to compose the same set of rules each time.) | You can save frequently used sets of rules as presets, and load them instantly. This saves you a lot of time. <br>(Without the presets, you would have to compose the same set of rules each time.) | ||
| Line 25: | Line 25: | ||
| Rename a preset <br> | | Rename a preset <br> | ||
| | | | ||
To rename a preset, follow | To rename a preset, follow these steps:<br>1. Press '''CTRL+M''' or use the '''Presets > Manage... '''menu option.<br>2. The Preset manager window pops up:<br>3. Select the preset you want to rename and then press '''F2''' or the [[Image:RenamePresetButton.png]] button.<br>4. The following dialog pops up:<br>[[Image:RenamePresetDialog.png|center]]5. Edit the name (or enter a new name), and press '''OK'''.<br> | ||
To abort the process at any time, press '''ESC'''.<br> | To abort the process at any time, press '''ESC'''.<br> | ||
| Line 34: | Line 34: | ||
The preset manager can show the contents of a preset (i.e., settings of all rules and filters) as editable text. You can simply edit the rules and filters by changing the text. <br> | The preset manager can show the contents of a preset (i.e., settings of all rules and filters) as editable text. You can simply edit the rules and filters by changing the text. <br> | ||
To rename a preset, follow | To rename a preset, follow these steps: | ||
1. Press '''CTRL+M''' or use the '''Presets > Manage... '''menu option.<br>2. The '''Presets manager''' window pops up:<br>[[Image:PresetsManager.png|center]]3. Select the preset you want to rename and then press the [[Image:EditPresetButton.png]] button.<br>4. A warning pops up:<br>[[Image:EditPresetWarning.png|center]]5. Click on '''Yes'''. <br> A Notepad (text editor) window pops up with the selected preset:<br>[[Image:PresetEditWindow.png|center]] Notice that-<br>''' *''' This window shows the preset name in the title bar, and all settings (rules and filters). <br> '''*''' In each rule, the parameters are shown in '''ParameterName:ParameterValue '''format. <br> '''*''' All such pairs are separated by a semicolon (''';'''). <br>6. Edit the settings and then close the file. A confirmation dialog pops up.<br>[[Image:SaveChangedmpFileDialog.png|center]]7. Click on '''Yes'''. Now the preset is edited.<br> | |||
|- | |- | ||
| Line 41: | Line 43: | ||
You may want to duplicate an existing preset and create a variation by editing it (or just take a backup of the preset before experimenting with it). | You may want to duplicate an existing preset and create a variation by editing it (or just take a backup of the preset before experimenting with it). | ||
To duplicate a peset | To duplicate a peset, follow these steps: | ||
1. Press '''CTRL+M''' or use the '''Presets > Manage... '''menu option.<br>2. The '''Presets manager''' window pops up:<br>[[Image:PresetsManager.png|center]]3. Select the preset you want to duplicate and then press the [[Image:CopyPresetButton.png]] button.<br>4. A duplicate copy of the preset is created. <br>5. Now go ahead and edit the original present or its copy.<br>6. Finally close the '''Presets Manager''' window. | 1. Press '''CTRL+M''' or use the '''Presets > Manage... '''menu option.<br>2. The '''Presets manager''' window pops up:<br>[[Image:PresetsManager.png|center]]3. Select the preset you want to duplicate and then press the [[Image:CopyPresetButton.png]] button.<br>4. A duplicate copy of the preset is created. <br>5. Now go ahead and edit the original present (or its copy).<br>6. Finally close the '''Presets Manager''' window. | ||
|} | |} | ||
Revision as of 04:39, 5 July 2009
A "preset" is a set of rules that is saved with a user-defined name. It can optionally save the Filter setting also.
You can save frequently used sets of rules as presets, and load them instantly. This saves you a lot of time.
(Without the presets, you would have to compose the same set of rules each time.)
ReNamer assigns a keyboard shortcut automatically to each saved preset, so that it can be loaded in the Rules pane with least effort.
You can create an unlimited number of presets (but in practice, you would need a maximum of 4-5 presets)
| To do this- | |
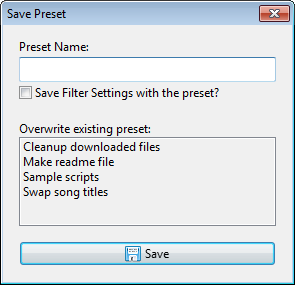
| Save a preset | 1. Load the desired rules in the Rules pane, as explained here.. 2. Set the Filters (optional). 3. Press CTRL+S (or use the Presets > Save As... menu option) 4. A window pops up:  5. Enter a new name in the Name box, or select one of the existing presets listed below to overwrite it. 6. Put a tick in the check box if you want to save the current filter settings. 7. Press the Save button. The preset is saved. ReNamer automatically assigns shortcuts to all the saved presets in a fixed sequence (The sequence is CTRL+1, CTRL+2, etc. These shortcuts cannot be edited.) Note: At any point of time, you can abort the process by pressing ESC. |
| Load an existing preset |
You can load any of the presets by pressing its shortcut (CTRL+1, etc. see above). |
| Delete an existing preset |
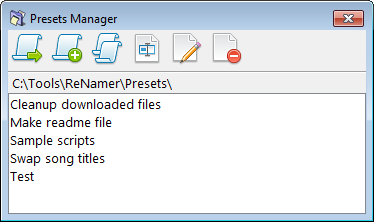
Sometimes you may not need a preset any longer. To delete it, follow these steps: 1. Press CTRL+M or use the Presets > Manage... menu option. 2. The Presets manager window pops up:  4. Close the Preset Manager window. |
| Rename a preset |
To rename a preset, follow these steps: 1. Press CTRL+M or use the Presets > Manage... menu option. 2. The Preset manager window pops up: 3. Select the preset you want to rename and then press F2 or the 4. The following dialog pops up: 5. Edit the name (or enter a new name), and press OK. To abort the process at any time, press ESC. |
| Edit a preset |
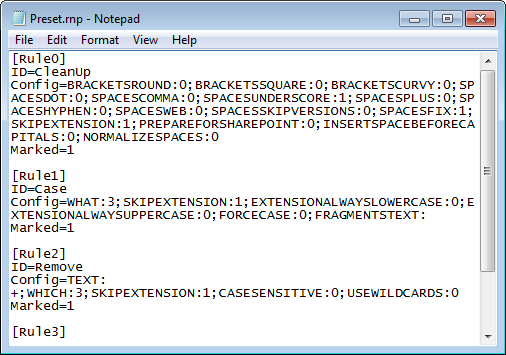
The preset manager can show the contents of a preset (i.e., settings of all rules and filters) as editable text. You can simply edit the rules and filters by changing the text. To rename a preset, follow these steps: 1. Press CTRL+M or use the Presets > Manage... menu option.2. The Presets manager window pops up: 3. Select the preset you want to rename and then press the 4. A warning pops up: 5. Click on Yes. A Notepad (text editor) window pops up with the selected preset: Notice that- * This window shows the preset name in the title bar, and all settings (rules and filters). * In each rule, the parameters are shown in ParameterName:ParameterValue format. * All such pairs are separated by a semicolon (;). 6. Edit the settings and then close the file. A confirmation dialog pops up. 7. Click on Yes. Now the preset is edited. |
| Copy a preset |
You may want to duplicate an existing preset and create a variation by editing it (or just take a backup of the preset before experimenting with it). To duplicate a peset, follow these steps: 1. Press CTRL+M or use the Presets > Manage... menu option.2. The Presets manager window pops up: 3. Select the preset you want to duplicate and then press the 4. A duplicate copy of the preset is created. 5. Now go ahead and edit the original present (or its copy). 6. Finally close the Presets Manager window. |

