ReNamer:Main menu: Difference between revisions
(Navigation added.) |
m (Den4b moved page ReNamer:Main Menu and keyboard shortcuts to ReNamer:Main menu: Better name) |
(No difference)
| |
Revision as of 11:17, 6 July 2019
In this appendix, all the menus and context menu options are described.
| Menu option | Keyboard Shortcut | What it does... |
|---|---|---|
| New Project | CTRL+N | Create a new project. Clear all rules and files. |
| Undo Renaming | SHFT+CTRL+Z | If possible, reverses the effect of the last renaming operation. |
| Paste Files | SHFT+CTRL+V |
Pastes the selection of files from the clipboard into the Files pane. |
| Add files | F3 | Starts a window to select specific file(s) from any folder and add them to the Files pane. |
| Add folders | F4 | Starts a window to add all files from a chosen folder (behavior depends on Filter settings) |
| Preview | F5 | Manual preview (not required if auto-preview mode is on) |
| Rename | F6 | Renames the file with a name shown in the New Name (New Path) column in the Files pane. |
| Exit | ALT+F4 | Closes the application |
| Menu option | Keyboard Shortcut | What it does... |
|---|---|---|
| All Settings | F8 | See Program settings for details. |
| General | Shows the General tab of the Settings dialog. | |
| Preview | Shows the Preview tab of the Settings dialog. | |
| Rename | Shows the Rename tab of the Settings dialog. | |
| Meta tags | Shows the Meta Tags tab of the Settings dialog. | |
| Miscellaneous | Shows the Miscellaneous tab of the Settings dialog. | |
| Filters | CTRL+F | Changes the default behavior when adding folders. |
Note: Presets are explained here
| Menu option | Keyboard Shortcut | What it does... |
|---|---|---|
| Load | Opens a submenu with a list of all available presets. Click on a preset to load its rules in the Rules pane. If the preset was saved with any filter settings, they will also be set.
Note: Be aware that all current rules will be lost. If you want to add a preset in the end of the current rules stack use Append preset option from Preset Manager. | |
| Save As... | CTRL+S | Saves the current preset. |
| Manage | CTRL+M | Opens the Preset Manager dialog. |
| Browse... | Browse to folder where presets are stored (via Windows Explorer). | |
| Import... | Select presets from any folder in your file system, which you want to be copied to ReNamer's Presets folder. | |
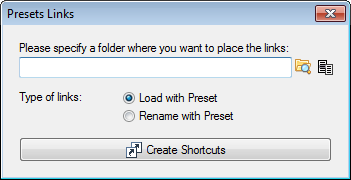
| Create links | The following window pops up:
Shortcuts will be created for every available preset and placed in the selected folder.
For more information, please see Command Line usage. WARNING: Be careful with the "Rename with Preset" option. It will rename files without asking for your confirmation! | |
| Rescan | Scans the preset folder for new presets. Useful if you have manually modified the content of the presets folder as you don't have to restart ReNamer to use them. |
| Menu option | Keyboard Shortcut | What it does... |
|---|---|---|
| Help (online) | F1 | Open online manual. |
| User Manual | Opens "User Manual" file which is distributed with the application (PDF format). | |
| History | Opens "History.txt" file which is distributed with the application. The file contains the list of changes for the current and previous versions. | |
| About | Alt+F1 | Shows a dialog that provides you with general information about ReNamer, and contact details in case you are facing any difficulties that are not covered in this manual. A right click on the white header of the dialog will place ReNamer's version information to the clipboard. (Now you can paste it into your posts at the forum.) |
