ReNamer:Manual editing
Manual renaming
In addition to combining multiple rules, you can rename any file manually.
The following example explains the process:
Note that manual renaming has a major limitation: It must be the last operation before renaming. Any activity in ReNamer GUI (such as adding/removing a file, adding/removing/editing a rule, pressing the Preview button, etc.) may reset the results of the manual renaming! This happens because manual renaming is not a rule; so its results cannot be passed on to the other rules for further processing. The rules always start with the file's original name.
We will check this out with multiple examples.
| Example-1: If you add a new rule, the effect of manual renaming is lost.
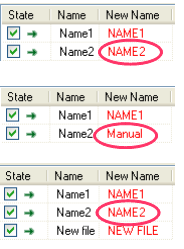
In this example, the file was renamed manually, and then a single Case Rule [1] was added to convert the names to ALLCAPS. Notice that this rule actually ignored the manually given name (Name 3) and acted on the original name of the file (Name2), and made it NAME2. |

| |
| Example-2: Manual renaming works if done after all the rules are added.
To conclude, the effect of the manual renaming survived because it was done after adding the rule. |

| |
| Example-3: Manual renaming is lost if Preview button is pressed.
If we press the Preview button, the manual renaming is lost, and the rules in the Rule pane take over again! In this example, we renamed the second file manually, and then pressed the Preview button. As a result, the ALLCAPS rule acted on the original name (Name2) again, and converted it into NAME2. |

| |
| Example-4: Manual renaming is lost when files are added (when the auto preview mode is turned ON)
In this example, the preview options are set to refresh the preview whenever new files are added to the Files pane of ReNamer. So, if we add a new file; ReNamer behaves as if we pressed the Preview button (The manual renaming is lost.) So the net effect is same as the Example-3 (above). Compare the three screenshots: The first screenshot shows the effect of the Case Rule[2], which is set to convert the name to ALLCAPS. Both file names are turned ALLCAPS. The second screenshot shows that the file Name2 is manually renamed to Manual. (The ALLCAPS rule still works on the first file.) The third screenshot shows what happens when “New file is added to the Files pane: The auto preview mode forces a refresh of the pane. As a result, the name of the second file is reset to its original name. Then the ALLCAPS rule acts afresh on all three names, and turns all the three file names to ALLCAPS. The net effect is as if the manual renaming was never done at all. |

|


